Showing posts with label organic. Show all posts

Tuesday, June 26, 2012

Nutrition in 100 Words

Back in April, I ordered a few items from Steve's Original which included some PaleoKits and PaleoKrunch cereal.  Both were very tasty, but what I loved even more was a card they put inside my box that sums up my experience over the last year and how my mindset has changed in regards to food.  It was titled "Nutrition in 100 Words" and I thought I'd share it on here.

Eat real, unprocessed food,
as close to nature as possible
and listen to your body.

Pretend the modern supermarket doesn't exist.
Choose foods that could be grown, hunted, or gathered -
nothing packaged or processed.
Support local farms when possible.

Eat animals, marine life, vegetables, nuts, seeds, and
fruits.  Eat plenty of healthy fats from pastured animals,
fish, coconut, avocado, olives, and cold-pressed oils.
Drink water.

Incorporate traditional, nutrient-dense foods:
fermented vegetables, organ meats,
and homemade bone broths.

Above all, ditch the "gurus", "programs", and "diets"
and get back to basics.  Connect with your intuition
and allow it to guide you.

I love it and just had to share!

Wednesday, September 1, 2010

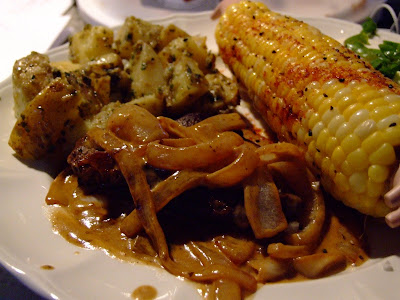
Steak with Onion-Blue Cheese Sauce (GF & Organic)

Probably my favorite recipe! I've shared this recipe with several people because it's so darn tasty, but it is SO easy! And frankly, easy works best in my life right now. This is straight from my favorite lady, The Pioneer Woman.

Here's what ya need:
2 steaks (ribeye, sirloin, something somewhat thin)...got these from our CSA
6 Tbs organic butter, divided (I said it was easy...not healthy)
1 whole organic yellow onion
1 cup organic heavy cream
1/2 cup organic blue cheese, crumbled
Salt & pepper

Salt and pepper both sides of the steak and then grill it in 2 Tb of butter. The recipe calls for medium rare, but I lean closer to medium.


Saute onions in 4 tablespoons butter over high heat. Cook for 5 to 7 minutes, or until dark and caramelized.


Reduce heat to simmer and pour in cream. Cook for 3 to 5 minutes, or until reduced by half.


Stir in blue cheese until melted.


Serve steaks on generous portion of sauce.


I added the Pesto Potatoes as a side. We also had corn on the cob with paprika & tomato slices with mozzarella cheese, balsalmic vinegar, and fresh basil. Yum!!!

Monday, July 26, 2010

My Ode to Corn

Oh my, I don't think I can tell you how much I love corn!

With our CSA, we've been getting at least 6 ears of corn a week. Some may get tired of all this corn, but not I. I usually run out before I get to try all the recipes I want and have to wait until the next week. There was actually a week where I bought 3 or 4 extra ears of corn at the Farmers Market just because I needed them for all of my ambitious goals for the week.

Corn is such a versatile plant and is truly an amazing thing in and of itself. So much of our world relies on corn since every part of corn is able to be used. I did learn an interesting fact this week. The minute that corn is picked, its kernels begin the process of turning to starch. Therefore, corn is best used (and sweetest) within the first couple days after it's been picked. Does that mean you can't use it later in the week? Of course not. But it sure does make you wonder how long it's been since it's been picked when you buy it at the grocery store. Just another reason to go local and support your friendly farmer neighbors!

I've used corn in at least 2-3 meals a week, but I thought I'd share my favorites that I've repeated a couple times already this summer.

The recipe for Corn with Bacon and Green Onions was definitely a hit on the 4th of July, so we ate it again for my dad's birthday alongside some Spinach-Walnut Chicken. I believe this dish is an excellent compliment to any meal...that is if it doesn't steal the show!

Another absolute favorite is Summer Stir-Fry! This is originally from Pioneer Woman and it is absolutely delicious! You could easily do it with chicken instead of shrimp, but oh boy, that shrimp is so yummy! My friend, Faith, saw this recipe the same time I did and we made it within a week of each other. Once she told me how truly delicious it was, I just had to make it right away. We've both had to limit how many times we make it...it's just that good! You can check out the recipe here on her blog or you can scope out the original over at Pioneer Woman.


Summer Salsa is an absolute must! Got this recipe from Faith last year and it is so refreshing! Please take note that it is not a spicy salsa, but a sweet one full of great CSA vegetables. I recommend it with some organic blue corn chips for an awesome snack!

Finally, I'm leaving you with Fire Roasted Corn Salad. This is a recipe from a little ole gourmet cooking store that I love and I just think this is such a tasty side dish! It's got everything I love in it!

You need:
  • Juice of 3 limes
  • 2 tsp. ground cumin
  • 1 tsp. chili powder
  • 3/4 cup olive oil
  • Coarse salt and pepper, to taste
  • 6 ears of corn
  • 3 cups cherry tomatoes, stemmed and halved
  • 1/2 cup diced red onion
  • 1/2 cup chopped fresh cilantro
  • 1/4 lb. feta cheese, diced

NOTE: I halved this recipe and still made plenty for just the two of us. The only thing I didn't halve was the feta cheese because, well, I think feta cheese is fantastic and should be used liberally.

In a bowl, whisk together the lime juice, ground cumin, and chili powder. Pour in the 3/4 cup olive oil in a slow, steady stream while whisking to make a vinaigrette. Season with salf and pepper. Set aside.

Prepare your corn. You can either grill it by brushing some oil on them and turning them over a medium-hot fire until lightly charred for about 10 minutes.....OR if it's absolutely sweltering outside and you really don't feel like creating a fire and grilling, boil your corn until cooked. You don't have to do it for too long because you don't want to overcook your corn until it's mushy.

Using a knife (or a corn zipper) cut off all of your kernels and place in a large bowl. Add your tomatoes, onion, cilantro, feta, and the vinaigrette and toss to coat evenly. I think it's great when you serve it immediately, but I also like it when it's cooled down. Makes a great side dish.


And yes, all of these recipes were made with organic ingredients and were all gluten-free...except for that Vanilla Porter in the above picture. That's just full of gluten!

I love corn!

Now go buy some and share some more yummy dishes with me!

Thai Green Beans (GF & Organic)

OK, confession....last week, I was in a major cooking slump!

I started working on my classroom to get back into the school year which is all too quickly approaching and by the time I came home...I just didn't wanna cook.
I think this is totally human of me and it was honestly nice to have some days off where I was 100% lazy. We did go out and enjoy some Japanese food one night which was absolutely fabulous! But I'm back in the routine this week and had some pictures/recipes that I wanted to post up here that fell to the wayside also last week. Seriously, what am I going to do once school starts. It's like I have to completely reorient myself with that way of life again!

Made these green beans as a side dish a few weeks back. They were featured as the recipe of the week on Simply in Season's website. My friend, Faith, has this cookbook and I loved it, but I have yet to purchase it. I've been using their recipe of the week for a few months now and they always turn out great. They always feature what is in season at this time so it's very helpful with my CSA.

For this, you need:

  • 5 cups fresh green beans
  • 1/2 onion, chopped
  • 2 Tb. ginger root, peeled and minced
  • 3 cloves garlic, minced
  • 2 tsp. sesame oil
  • 3 Tb. GF soy sauce
  • 2 Tb. GF Thai sweet chili sauce
  • 1 cup extra firm tofu, crumbled (optional)

All vegetables/ingredients were organic. As a side note, the tofu is completely optional and would be just fine without it. I understand being skeptical, but my hubs is always wanting to try new stuff so I went with it and it was very good. I would recommend not only because it tasted good, but because it is so good for you! Totally up to you though.

Steam your green beans 8-10 minutes until they are bright green and lightly crunchy.

Get your onions, ginger, and garlic all chopped, peeled, and minced.

In the sesame oil, saute onions, garlic, and ginger over medium heat until the onion is tender. Takes about 5 minutes.

Add your soy sauce and sweet chili sauce. You can measure it out or just add to taste.

Add your tofu (if you choose) and cook for another 5 minutes.

Add your green beans and stir to coat them with the sauce. Simmer over medium-low heat for 5 more minutes.

You can eat these over rice if you want to make a whole meal out of it, but we served it on the side with some chicken and potatoes and saved all the leftovers for lunch over the next couple days.


Tuesday, July 13, 2010

Lemon-Basil Ice Cream (GF & Organic)

So, while staying on this basil kick, I figured I'd add my recipe for Lemon-Basil ice cream.

Don't knock it until you try it!

It was the most refreshing ice cream I've had. So incredibly yummy! Mark and I gobbled it up (see my previous post about his love for basil pesto) before I could even get a finish product picture of it. Sorry!

I got the original idea from a recipe for Lemon-Basil yogurt in my Taste of Home magazine and decided to adapt it to what I wanted.
Here's what you need:

1 cup organic cream
3 cup organic milk
4 organic egg yolk
2/3 cup organic sugar, divided
1 bunch of fresh basil
1 organic lemon
1 T organic vanilla (Those observant eyes will see that I didn't have any organic vanilla that day...oops!)
salt
organic walnuts, optional

Put the milk, cream, zest from the lemon, salt, and 1/3 cup of sugar in a medium-large saucepan. Squeeze the juice from your lemon and tear up your basil leaves and place in the cream mixture. Bring almost to a boil, but remove from heat before it gets to a boil.

Cover the mixture with a lid and let it steep for at least 30 minutes. The longer it steeps, the better the flavor.

In a separate bowl, beat your egg yolks, the remaining sugar, and vanilla for about a minute or until pale.

This is where I removed the basil. You could leave the basil in during the next step and it'd be fine and I know some recipes leave the basil in, but I didn't want a gritty texture, so I removed the basil here.

Take about 2 Tb. of the cream mixture and place in the eggs. Whisk it in. Add another Tb or so and whisk in. It's important to temper your eggs so that they don't scramble when you add them to your warm mixture. Then you may transfer your egg mixture into your lemon mixture.

Cook this for 4-6 minutes on medium heat or until it coats the back of a spoon.

Let this cool completely either in the fridge for a few hours or in an ice bath for about 30 minutes.

Once cooled, put in your ice cream maker and let it do it's thing.

In the last 5 minutes, you may add the walnuts if you like. I thought this was a great addition!

Like I said, I don't have any final pictures because we ate it too quickly. It was the perfect after dinner dessert because it was so cool and refreshing!

Enjoy!

Sunday, July 4, 2010

A Dessert Fit for Fourth of July (GF & Organic)

After our delicious Fourth of July meal, I decided that I needed a dessert that would fit in with the magnitude of this wonderful holiday! I wanted something light and I wanted something summery. I decided to try a recipe from a certain gourmet kitchen store that I may or may not receive a paycheck from occasionally.

This is a recipe for Mango Pineapple Sorbet.

I have adapted it to be completely organic and it was already GF...yay!


For this mouthwatering dessert, you will require:


2 organic mangoes, peeled and pitted (easier said than done)
3 Tb. fresh squeezed organic lime juice
2/3 cup organic sugar
1 cup fresh organic pineapple, chopped fine

I also added 1 organic red banana.


This was not in the original recipe and it is certainly not needed, but it was just laying there and ended up adding some awesome flavor.

Put your mangoes and bananas in a food processor or blender and puree until smooth.

Add the sugar and lime juice and blend together well.

Now for the pineapple.

Here's one nifty tool that I have put to great use all summer.

My pineapple corer and peeler.

We used to not purchase pineapple because it's impossible to cut it and not end up with the eyes or the hard core part.

In fact, when the hubs wanted to buy one once, I told him he could buy it if he'd cut it. After that night, he was done with pineapple.

....that is, until I brought home my corer...


Makes it SO simple to have fresh pineapple!

Anyway, I digress....

Put your mixture in a large bowl and stir in your 1 cup of pineapple.

I suppose this could be done without taking it out of the blender.

Add your mixture to an ice cream maker and let it do it's thing for the next half hour.

On a side note, my ice cream maker is one of my favorite purchases, hands down!

Look at how yummy that is!

And it was so easy (if you forget that whole pitting/peeling of the mango part). I will be partaking of this dessert for days.

In fact, I could go for some right now...

Happy holidays!

Happy 4th of July!!!

Happy, happy, happy 4th of July to everyone!

I'm writing this as I listen to sporadic explosions going off in the distance all around my house. Gotta love this holiday!!!

I've got to say that I had a fantastic holiday even though it did not entail much at all. Yesterday, we sent my brother off to travel the world (more on that later), and today, we slept in (accidentally), made a HUGE lunch together, and watched a movie. Didn't do a whole lot, but it was a great break from the everday routine. Just sat around, cooked together, and all-around enjoyed each others' company.

Today, I tried out a couple different recipes with the help of my best girls overlooking the event. This is one of my favorite pictures of the 3 of us and will remain a staple in my kitchen!

First off, with all of my delicious corn from our CSA, I tried to find a new angle for corn other than on the cob. I'm getting at least 6 ears of corn a week and was looking for a way to spruce it up. What better way is there than to add BACON!!!

Here's the recipe for Corn with Bacon & Green Onions (real original title, right?) that I got from Tasty Kitchen. I adapted it to be organic and GF (the fresh cheese makes it GF).

You're gonna need:

4-5 ears of fresh corn (you could also do a 10 oz. bag of frozen organic)
2 bunches of green onion Got this from the FM
6 (or 7...or 8) slices of bacon (Once again this is from Hillside Heritage Farm. I will never cook with another again)
1/2 cup fresh shredded organic cheddar cheese
1/2 cup organic heavy cream


Go ahead and cut that bacon up into bite-sized pieces and fry those guys up in a large skillet. I'm telling you, this bacon cooking even SMELLS better when cooking. I'm in heaven!

While that's frying, go ahead and chop up your green onions to get them ready.

Also, you'll need to get your corn kernels off the cob if you're using fresh corn.
I bought this lovely corn zipper to help with my de-cobbing.

It worked like a dream!

Once that bacon is done, scoop it out of the pan and set aside, but leave the drippings in the skillet.

Add your green onions to the drippings and let those cook until they get soft.

Once those green onions are soft, turn your heat down to low and add your corn and fresh grated cheese. Stir these and let them cook for about 5 minutes.

Finally, add your bacon back in and add your cream. You can add a little salt & pepper here to taste if you like, but I forgot to and I found that it certainly didn't need it. Stir that and let it cook for another 5 minutes or so. Once you let all of those flavors meld together, you are ready to eat.

Let me just say here that I would like to officially change the title of this recipe to "Oh My Deliciousness!" This was SO unbelievably good and a perfect use of my corn!

Now, to pair it with something....

Decided to make Balsamic Glazed Grilled Salmon
(This recipe is GF, but not organic....but still tasty!)

You will obviously need some fresh salmon fillets. We got these beautiful looking specimens at Whole Foods. Yum!

For the glaze, you need:

1/4 cup balsamic vinegar
1 Tb. lemon juice
2 Tb. water
3 Tb. brown sugar
lemon juice from 1 lemon
1 tsp. Tabasco...I think I added a lot more than this

Pepper both sides of your fillets to get them ready for the grill. When grilling, oil some foil to set the fish on and perforate it a bit. The hubs is responsible for all grilling actions since he is truly the expert, so I have no pictures of the cooking process.

Mix all of the glaze ingredients together until the sugar dissolves. Use this to spread on the salmon as you grill it. This makes a nice crunchy glaze on the fish.

When you're done, if you want to use more of it, just throw it in a saucepan on low heat until it's heated throughout and you can spread it on your salmon before you eat it.

I also paired these two recipes with some fresh green beans from the FM.

What a perfect Fourth of July meal!!!

Not your traditional burgers or brats, but I thought it was pretty fantastic.

Next, I'll share what we had for dessert. And no, it's not apple pie...

Happy holidays!!!


Wednesday, June 30, 2010

Smoky Tomato Bacon Pasta (Gluten Free & Organic)

Today it is absolutely BEAUTIFUL outside! Hardly any humidity, it hasn't hit 80 degrees yet, the sun is bright, and the sky is blue with hardly a cloud in the sky. Very uncharacterstic KY summer day....and I LOVE IT!!!

So, what better reason is there to post a new recipe. Now, this one is super easy and absolutely delicious. I originally got it from Paula Deen's Family Cookbook that I received (signed) when Jen and I went to see her. I love this recipe and I've made it several times. Seriously....it has bacon in the title. What's not to love??? It easily makes enough for 6 people, but it's just fine for a couple because the leftovers are just as yummy!

I adapted it to make it both GF and organic and served it when we had Molly & Eric over for lunch the day. There's not as many pictures of this since I was enjoying my time with our guests.

You'll need:

  • 1/2 lb. bacon (~10 slices) I got mine from Hillside Heritage Farm at the Lexington Farmer's Market thanks to a recommendation from a friend. I will never look back!
  • 1 large organic onion, chopped
  • 1 (28 oz.) can of organic diced tomatoes, undrained
  • salt & pepper, to taste
  • 4 oz. organic cream cheese (1/2 of a package)
  • 1 lb. gluten-free pasta First time I used the Tinkyada brand & LOVED it! I used penne, but the original recipe calls for rigatoni. Hard to find GF rigatoni, go figure!

1. In a large bowl, begin to boil your water and cook your pasta according to the box/bag. Tinkyada gave energy saving instructions. Just had to boil water, boil pasta for 1-2 minutes, turn off heat, and cover for 20 minutes. Pasta came out perfect and it was very energy efficient!

2. In a large skillet, cook bacon until crisp & brown. Place bacon on a paper-lined plate. Pour off all but 1/4 c. of fat from skillet.

3. Add the onion & cook over medium heat, stirring occassionaly until soft (5-7 min).

4. Stir in diced tomatoes & crumbled bacon. Season with salt & pepper & simmer until thick & chunky (~10 min). Stir cream cheese in until melted.

5. Pour sauce over pasta & mix together. Serve immediately.

See, how easy is that! This picture was taken after we devoured it because I was too distracted and hungry to take one when it was ready. Better late than never, right?

I definitely recommend trying it. Eric is a picky eater and doesn't care for onions & tomatoes (great recipe for him, right?), but he ate around it and said he still really liked the taste.

I served this with fresh green beans (not pictured) that I just steamed. I placed them in a collander, put a tiny bit of organic olive oil on them, and grated some fresh Parmesan on them. They went together well.

Enjoy the recipe and enjoy this GORGEOUS day!!!

Sunday, June 27, 2010

Summertime Beverages

Seeing as it's summer, there is nothing I enjoy more than finding a good book to read and enjoying it with a nice, cold drink on these hot, summer days. Now, the hubs carries around his infamous gallon jug of water at all times. There's no way I can carry that around all day, but I do like to tote my little bottle of water and refill throughout the day to keep hydrated.

In the past week I've been drinking my daily intake of water, but I just can't get enough of those typical summer drinks. Last night, I made Mark's stepmom's recipe for lemonade and there's truly nothing better on a hot day.


It's the easiest thing ever. All you have to remember is 4-1-1.

Take 4 lemons and squeeze them into your container. I like to use a strainer so I don't end up picking out a bunch of seeds.
Add 1 cup of sugar.

Add 1 cup of water.
Stir until all of the sugar is dissolved.

Fill up the rest of the container with water.
How easy is that??? And trust me, it's so good! I always like to cut up an extra lemon, but it's not necessary.


If there's one thing that reminds me of childhood summers, it would be my mom's sun tea. I love iced tea, so I finally bought a container the other day so that the sun could do all the work for me.

(Mark says my green sun tea looked like pickle juice!)

Fill your clear gallon container with water.

Add 6-9 tea bags (I used 7 and I used organic green tea since it's so full of antioxidants).

Let the container sit in direct sunlight for several hours. The sun heats it up and the teas steeps.

Remove the tea bags.

If you want sweet tea....and I do LOVE sweet tea, this is where you add your sugar. I added about 1 1/2 cups of sugar, but since I'm a true southern girl and I live for the sweet tea that will make a northern's stomach sick, I'll probably make it 2 cups next time.

My parents never liked sweet tea (they are those northerners), so I always had unsweetened sun tea growing up. If you're not a sweet tea fan, might I suggest what I did all the time as a kid. Fill your glass up 3/4 of the way with tea and then finish it off with some of that lemonade.

Now I just need my book and the rocking chair on the front porch. Ahh, I love summer!